
Showcasing the flexibility of TYPO3’s Form Framework
Let us inspire you to fit it to your own design

Embedding forms into a website is a basic requirement when selecting a content management system (CMS) today. Requirements for working with forms can range from simple to complex. Perhaps you want to add a contact form to the contact page or embed a form from a third-party application like Hubspot or Salesforce; or maybe you need to enable your marketers and editors to create custom forms on the spot within the CMS. Luckily for us, TYPO3 CMS comes with the system extension “form” that can handle almost any usage scenario you can think of. One of the main benefits being that editors can create forms with just a few clicks.
The “form” system extension is highly configurable, offering an enormous array of options, configuration settings, and templates. This sort of flexibility can be daunting, but don’t worry. We’re going to talk you through how we implemented forms on the TYPO3 Demo website so you can get a feel for what’s under the hood and how to adapt it to your own needs.
If you’re familiar with the Bootstrap framework, you’ll probably be able to get started creating forms that look okay out-of-the-box. This is because the form extension comes with a set of templates (and a concept for their use) that draws from the Bootstrap framework. If not, then you will need to dive into setting up TYPO3’s form extension with your own templates, according to your own use case and configuration requirements. At b13, we prefer to work with custom markup, CSS, and JavaScript because it is easier to maintain in the long run.
TYPO3’s form extension: What’s in the box?
Let’s take a look at what’s included with TYPO’s core extension “form”:
- Create forms in all shapes and sizes, from simple contact forms with a few fields to multi-page forms including complex validation, custom form data processing, and more
- Editors can create forms from scratch or based upon included or custom-built example form definitions you provide yourself
- Form comes with around 20 field types and a set of commonly used, powerful validators to give you full flexibility to build custom forms
- A form filled out in the frontend can be processed using one or multiple so-called “form finishers” for sending an email, saving form fields to the database, saving uploaded files to the file system, etc.
- All form definitions are saved using a YAML configuration file under the hood, making it possible to create forms and deploy across servers, multiple TYPO3 instances, and reuse form configurations across multiple projects or for similar forms in a multi-site setup
TYPO3’s form extension: When to use it?
At b13 we have projects where we use this extension in multiple ways and various places. We have projects where we use the extension as a basis for a simple contact form—and remove most of the other features (or just hide the form editor from regular editors). We also work with solutions like custom built mini-extensions that just save some data to the database.
Example use case: Editors create and edit forms
TYPO’s form extension is great for when your editors need freedom to create and change forms. They can add or remove fields, as well as change labels and descriptions inside a form.
Example use case: Editors choose predefined forms
Say you need one contact form that sends out emails to a customer service email address, and you don’t want anyone to change it. You can use the extension to create that form and save the configuration into your version control. This means you can remove the form editor from your backend users so that they only work with predefined forms—giving you a tightly integrated, regularly upgraded form extension. The form extension is maintained by TYPO3’s Core team, which means it is regularly updated.
Example use case: Forms integrate with other systems
Perhaps you want to build a contact form that is integrated with or exports to external systems. With this type of specific workflow, you won’t want anyone to change the structure or placement of the form. In this instance you might opt to create a small, custom-built extension for that specific use case. Sometimes it’s easier to create a form with a single template that fits your design and requirements instead of changing lots of Fluid partials, and messing with CSS class configuration and error handling.
How to configure TYPO3’s form extension to your needs
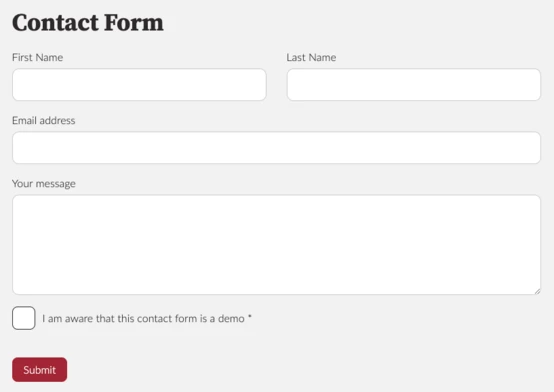
On the official TYPO3 Demo website, we recently added form features as a showcase of what you can do with forms in TYPO3. We wanted to create a simple contact form as an example, and also show the form editor’s capabilities, so that people can test out what is possible with this module. To make sure we met all our internal requirements and had a consistent layout and design, we needed to install the form extension and customize the setup. Our requirements:
- Use our own, custom templates for forms, with custom markup
- Prepare a default contact form, that is not editable (but may be used as a preset for creating new forms)
- Remove field types we did not customize for this project
- Remove finishers from the system (we do not want the TYPO3 Demo project to turn into a spam machine sending out emails left and right)


Install form extension and prepare your system
To install TYPO3’s form extension,load the extension and add it to your system. We use composer to do so:
composer req typo3/cms-form
Alternatively, you can use the Extension Manager to install Form Framework and activate the “Form” extension.
You will see the form module icon in the backend module menu. Add the extension’s TypoScript setup to your site extension package to enable frontend output for forms:
@import 'EXT:form/Configuration/TypoScript/setup.typoscript'
In the steps to follow we want to change the default configuration to fit our requirements. We want to use our own template files for form templates and add the following TypoScript to our setup:
1
2
3
4
5
6
7
8
9
10
11
12
13
14
15
plugin.tx_form {
  settings {
    yamlConfigurations {
      100 = EXT:site_t3demo/Configuration/Yaml/FormSetup.yaml
    }
  }
}

module.tx_form {
  settings {
    yamlConfigurations {
      100 = EXT:site_t3demo/Configuration/Yaml/FormSetup.yaml
    }
  }
}
You might be confused looking at this because it seems redundant: the plugin.tx_form key registers our FormSetup.yaml file for frontend rendering of the forms, while module.tx_form announces our YAML file to be taken into account within the backend form editor module.
Note
Configuration for forms is done in YAML files, as opposed to what you might be used to from most other plugins in TYPO3. The reason is that YAML can be used agnostic of backend and frontend configuration, which is typically done via PageTsConfig and TypoScript respectively.
Customize form templates
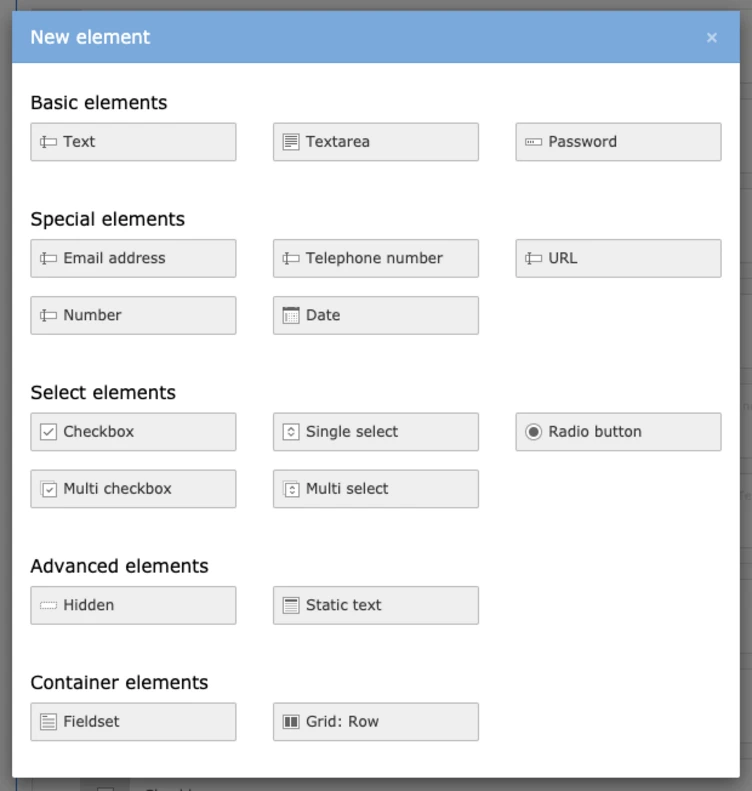
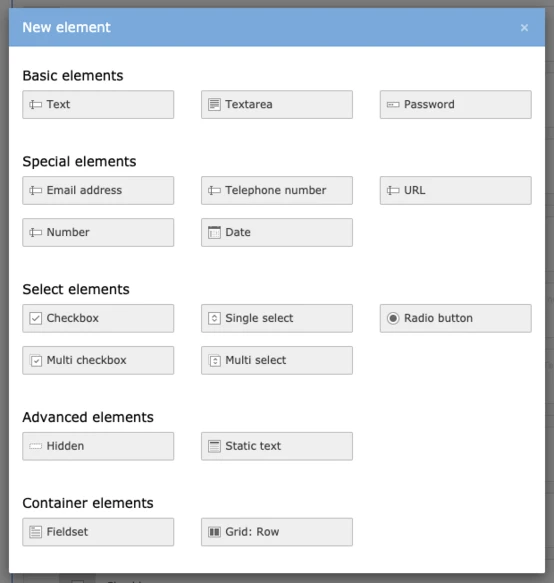
Next, we created an example form using the form module that includes all the field types we wanted to make available for use by editors and marketers within the TYPO3 backend. This involves creating a new form (using the form module) and adding that form to a page in our page tree (using the form content element) to see that form in our website’s frontend.
All form elements (the form itself, fieldsets, and all individual elements) are rendered using default Fluid Templates and Partials you will find within the folder sysext/form/Resources/Private/Frontend. So, to change a template to fit our desired markup we added our own template for each element within our site extension package folders. We use the folder Resources/Private/Plugins/Form/ inside our site extension package.
To make form use these templates, we add the Fluid paths to the FormSetup.yaml, like this:
1
2
3
4
5
6
7
8
9
10
11
12
13
14
TYPO3:
  CMS:
    Form:
      prototypes:
        standard:
          formElementsDefinition:
            Form:
              renderingOptions:
                templateRootPaths:
                  20: 'EXT:site_t3demo/Resources/Private/Plugins/Form/Templates/'
                partialRootPaths:
                  20: 'EXT:site_t3demo/Resources/Private/Plugins/Form/Partials/'
                layoutRootPaths:
                  20: 'EXT:site_t3demo/Resources/Private/Plugins/Form/Layouts/'
A typical partial for a form field, like a simple text input, could look like this:
1
2
3
4
5
6
7
8
9
10
11
12
13
14
15
16
17
<html
  xmlns:f="http://typo3.org/ns/TYPO3/CMS/Fluid/ViewHelpers"
  xmlns:formvh="http://typo3.org/ns/TYPO3/CMS/Form/ViewHelpers"
  data-namespace-typo3-fluid="true"
>
<formvh:renderRenderable renderable="{element}">
  <f:render partial="Field/Field" arguments="{element: element}" contentAs="elementContent">
    <f:form.textfield
      property="{element.identifier}"
      id="{element.uniqueIdentifier}"
      class="b_form__text {element.properties.elementClassAttribute}"
      errorClass="{element.properties.elementErrorClassAttribute}"
      additionalAttributes="{formvh:translateElementProperty(element: element, property: 'fluidAdditionalAttributes')}"
    />
  </f:render>
</formvh:renderRenderable>
</html>
So, by adding Fluid templates to our site extension, little by little the form markup can be changed to fully fit our requirements for markup and structure. You can change the way fields, in general, are rendered (if you want to change the position of error messages, for example), or change individual markup for all bits and pieces, like the “mandatory field” indicator.
Use predefined form configurations
In the Demo project, we wanted editors to be able to copy forms, but not edit or delete them. To make a form available to editors for use only, or as a basis to copy custom forms from, you can add a form configuration YAML file to your site extension package. The simplest way to do so is by creating a form with the form editor, saving your configuration, and then moving the file you created from the default path in your fileadmin directory to your extension directory. Make that directory known to your form configuration setup in your FormSetup.yaml file to be able to use forms you deploy with your site package:
1
2
3
4
5
6
TYPO3:
  CMS:
    Form:
      persistenceManager:
        allowedExtensionPaths:
          10: EXT:site_t3demo/Resources/Private/Plugins/Form/Forms/
Advanced configuration
For the Demo project, once we had the form looking the way we wanted, we didn’t want editors to be able to change it. So let’s look at optimizing the configuration to make sure editors won’t use field types you did not customize, or use finishers you do not want them to use. This is done using the aforementioned YAML file. If you look inside the Configuration folder for TYPO3’s form extension you will find a lot of configuration split into different YAML files, that define the default behavior of all forms and form fields. If you want to change something, find the key within these files and then add the changed configuration to your own setup.
Remove field types you don’t need
In our example, we wanted to remove the field types “File Upload”, “Image Upload”, “Advanced Password”, “Date Picker”, and “Content Element”, all of which we deemed not needed for testing and demonstrating purposes. Here’s how we removed these form elements from the form editor for all backend users:
1
2
3
4
5
6
7
8
9
10
11
12
TYPO3:
  CMS:
    Form:
      prototypes:
        standard:
          formElementsDefinition:
            # remove field types we do not show or have no custom template/styling for
            FileUpload: null
            ImageUpload: null
            AdvancedPassword: null
            DatePicker: null
            ContentElement: null
Remove or change configuration options from a field type
Next, we wanted to change the “Grid row” configuration: Our design called for a maximum of two columns, non-configurable and with a fixed responsive behavior. So there was no point in having responsive bootstrap-grid-size-options displayed for editors that did nothing and would just confuse users. By removing three of the four viewPorts from the configuration and setting a fixed CSS class name we could configure the default template to fit our needs without adding our own template.
1
2
3
4
5
6
7
8
9
10
11
12
13
14
15
16
17
TYPO3:
  CMS:
    Form:
      prototypes:
        standard:
          formElementsDefinition:
            # reset the grid class to only use 2 or 1 column
            GridRow:
              properties:
                elementClassAttribute: 'b_form__row'
                gridColumnClassAutoConfiguration:
                  viewPorts:
                    xs:
                      classPattern: 'b_form__col'
                    sm: null
                    md: null
                    lg: null
Next, other field types also have configuration options for responsive behavior, where an editor can set the display width for certain breakpoints. Again, our design was more restrictive and these options were not needed, so we removed these settings from the text field type by removing the “editors” key with index “700” (see the original YAML file inside sysext/form to find the original configuration).
1
2
3
4
5
6
7
8
9
10
11
TYPO3:
  CMS:
    Form:
      prototypes:
        standard:
          formElementsDefinition:
            # remove responsive options/field width from text input fields (not used)
            Text:
              formEditor:
                editors:
                  700: null
If you want to remove a finisher from the default setup (in our case we wanted to remove the options for sending emails of any kind using any finisher) you can remove finishers from your setup in a similar way:
1
2
3
4
5
6
7
8
9
10
11
12
13
14
15
16
17
TYPO3:
  CMS:
    Form:
      prototypes:
        standard:
          formElementsDefinition:
            Form:
              formEditor:
                editors:
                  900:
                    # remove finishers not needed or wanted for demo project
                    selectOptions:
                      # email finishers: we do not want to send out any emails
                      20: null
                      30: null
                      # "delete upload": no file uploads possible
                      50: null
Check out the TYPO3 Demo website to see how we implemented forms.
Dive into the code for more configuration options
These examples are enough to get you started, or to provide basic, working form configurations for your websites. You can enable or disable form definitions folders to completely remove options for editors to change your default form definitions; you can add your own form finishers to process data your users enter into your form, add your own field types, and much more. A good way to do that in our experience is to look into the code to see how things are done for everything shipping with the default setup, and then start working from there. There’s a number of YAML and Fluid files shipped with the form extension, and once you’re comfortable with browsing through these files you will find what you’re looking for, and therefore will be able to change, remove, or expand on what is provided by default.
Get in touch with us if you need help implementing your own forms or have a use case that requires a tailored solution.
If you’ve built an amazing form, we’d love to hear about it!