
Optimizing Collaboration and Version Control in TYPO3: A Guide to Workspaces

Content management in TYPO3 projects nearly always involves multiple parties working together. Content creators, editors, designers, and more join forces to produce, review, and publish content. The complexity increases within a large company with many players, when localized content comes into play, or when there’s significant back-and-forth. This can tangle up workflows and slow the entire create-to-publish process down. Tools and features that enable smooth collaboration and coordination are crucial for efficient content management.
Workspaces are how TYPO3 does content staging, providing a controlled environment for staging, previewing, and approving content before publishing. Workspaces are useful for the solo editor, but help teams especially by easily enabling content separation, collaboration and review, versioning, workflow and approval processes, content previews, and scheduled publishing. With Workspaces, teams can:
- Enable other members to work on different versions of a website simultaneously
- Involve others to sign off or edit content before publishing
- Share live previews without granting unnecessary backend access
Need help with TYPO3 Workspaces?
Contact b13 for expert assistance!
Everyday Challenges for Editors
Content managers and editors clear all sorts of hurdles in their daily tasks. Sometimes, these hurdles are linked to limitations of their CMS. Editors are resourceful, and will usually find a way to “make it work,” but for each task, every workaround carries its own drawbacks.
Task: Update editorial content across multiple blog posts at the same time.
- Workaround: Change what needs to be changed as fast as possible, and accept that content changes will get published one by one.
- Limitation: If you have lots of pages that need updating, depending on your speed, you might be displaying a mixture of “old” and “new” content for a considerable amount of time. This issue gets multiplied depending on your number of languages.
Task: Content needs approval from someone without backend access, such as an external partner.
- Workaround: Editors publish new pages and use “Hide in menu” so the page can’t be navigated to.
- Limitation: While this approach allows you to send a link for approval to someone without backend access, depending on your website, regular users might also accidentally see your new pages or your content might get indexed by Google before you’re ready.
Task: Editors need to make changes to live pages.
- Workaround: Without a staging environment, at b13 we’ve seen all kinds of workarounds, from using the “show content of this page” feature to duplicating full pages and updating a copy of the “live version” to prepare the change.
- Limitation: In theory this works, but once you consider larger sites with lots of links between pages in multiple languages, this leads to broken links and 404s, with links to now-deleted pages.
Task: You want to add a new page to your site and need to collaborate with others.
- Workaround: Editors prepare new content on pages that are unpublished.
- Limitation: While the content is hidden from your regular website users and search engines, you cannot show the pages to other people for approval without granting them access to the backend—the new page simply is not accessible without a valid backend user session. Additionally, if you need to change content across multiple pages or want to proofread special display versions of your new content (like teaser listings for news articles), you might be unable to preview hidden pages.
What is a TYPO3 Workspace?
A Workspace is like a separate environment inside of TYPO3. Here, you can edit content, test your changes, group your changes, and preview everything you did within the TYPO3 backend without changing your live website at all. Think of Workspaces as an “in-system copy” of your live website. You can safely work on your changes, reorganize your content, and prepare what you want to publish without actually publishing anything until it’s ready.
Understand Workspaces concepts and benefits
Versioned Content
At its core, Workspaces handles “versioned content” — an alternative version of a database record created, deleted, or modified in a Workspace, which an editor can publish at any given point in time.
Collaborative Work
In TYPO3, you can build thousands of Workspaces with different permission sets, and editors can share multiple Workspaces. That makes it possible to work collaboratively on content, with full preview functionality, and then coordinate “going live” with the content.
Content Staging
Workspaces use “stages” to make up a workflow — a review process. The defaults are “Draft,” “Review,” and “Publish,” and these stages are especially useful when working in teams. As an example scenario, supervisors can be notified when a piece of content needs their review, and are able to send the content back to the editor for improvement, pre-publish.
Live-Preview of Offline Content
Content that is still in progress can be previewed and compared side-by-side with the live version. Editors can see every change, either visually or in a list.
How Workspaces address the everyday challenges faced by editors
Workspaces allow editors to create a new page not visible to the world, or real-life previews that sit “inside” your website so you can more objectively judge what you’re about to publish. Editors can establish multiple workspaces for different purposes or user groups, limit user access (to draft-only, for example), add custom stages to tailor their publishing workflow, and prepare multiple changes and publish all of them at once. Editors can also generate pre-publish links to let others see an integrated preview of what’s about to go live, including your website’s design, menus, etc. — all without resorting to any workarounds or hacks.
How TYPO3 Workspaces Work
Creating and editing content in a Workspace
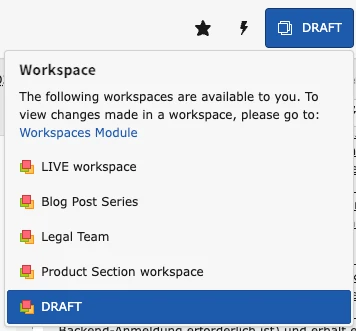
Set up a simple “Draft” Workspace so you can start entering content. You can even switch between Workspaces with the Workspace switcher. The backend features a green bar or a visible notice at the top to make it clear that you’re working in a Workspace.
Generating preview links for collaboration
The Workspaces module shows a list of changes within the current Workspace and allows you to publish your changes to the live site. At the top of the module window, the editor can create special preview links to share the current page in a Workspace version. By default, these links will be valid for 48 hours, but you can change this in your configuration.
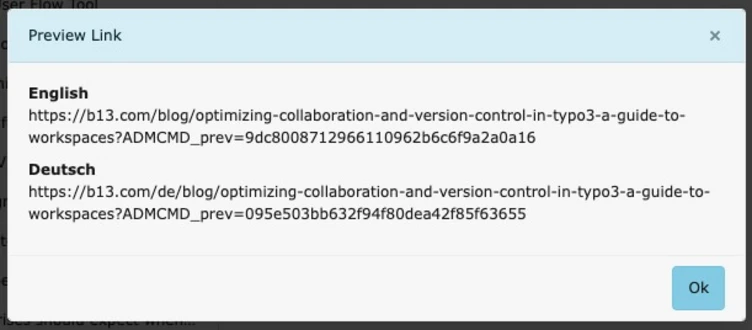

These preview links can be shared with anyone you want to proof-read a blog post before publishing. Once someone clicks on that link the user will be logged into this particular Workspace (without needing an account or a backend login) and will be presented with a full preview version of the page you just created.
But wait, there’s more: This is not just a preview link for the particular page you created—the user is logged into the Workspace. And that Workspace is a 100% representation of what the website will look like if all the changes prepared within the Workspace were published to live. Any recipient of the preview link will be able to read the new blog post, switch the language, use the menu, see the list of all blog posts—including the yet unreleased post—and so on. The user will not just be able to proof-read the new page, but everything else that could change as a result of the newly added content—think navigation, overview teasers, related articles, and more.
Comparing live and workspace versions
Editors have a preview window and, depending on what has changed and which URL is being previewed, it presents some additional features and options—for example, a split view for comparing the current version with the live version. You can click on a “Blog” page that lists all the latest blog posts and compare the list view of the live instance with the version from the Workspace. There are different viewing options (Slider, Horizontal, Vertical) that you can switch between, depending on what’s best for the layout your website is using.
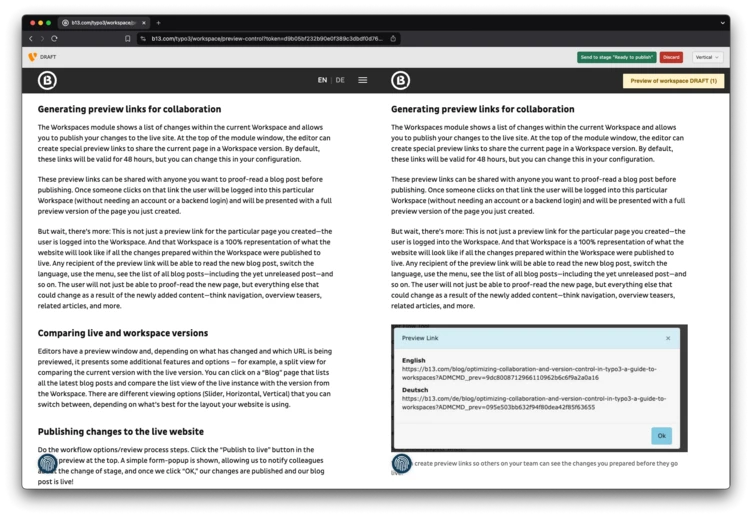
Publishing changes to the live website
Do the workflow options/review process steps. Click the “Publish to live” button in the editor preview at the top. A simple form-popup is shown, allowing us to notify colleagues about the change of stage, and once we click “OK,” our changes are published and our blog post is live!
Setting up a Simple TYPO3 Workspace
- Make sure you have TYPO3’s system extension “Workspaces” installed. If this extension is missing, run
composer req typo3/cms-workspacesand install the extension, or ask your developer team to do it for you. - Using the “List” module, create a new record of type “Workspace” in your installation’s page root (PID 0). You will need to have admin privileges to do this.
- In the create record form, add your Workspace title (in this case “Draft”) and leave all other fields alone to use the default values.
- Try it out—change your active Workspace using the Workspace Switcher Icon in the top menu bar.
Tips for managing Workspaces and user access
TYPO3 allows you to define granular permissions for each Workspace. You can configure access rights at a detailed level, specifying which users or user groups can perform specific actions within a Workspace. You can fine-tune access control at an even deeper level, granting exceptional privileges to specific users as needed. For example, you can grant some users the ability to edit content in a Workspace, while others may only have read-only access. This is particularly useful in scenarios where you have confidential or sensitive Workspaces that require specialized access.
Advanced TYPO3 Workspace Features
Multiple Workspaces for different purposes or user groups
You can create Workspace-specific user groups. This approach enables you to have different sets of users with distinct permissions for each Workspace. By organizing users into Workspace-specific groups, you can easily manage access rights and ensure that users have appropriate privileges within their designated Workspaces.
For more complex content management requirements, you can create a hierarchical Workspace structure. This involves setting up “parent” and “child” Workspaces, where “child” Workspaces inherit permissions from their “parent” workspaces. This approach provides a hierarchical control mechanism, allowing you to manage access at different levels and cascade permissions to multiple Workspaces simultaneously.
Custom stages for your publishing workflow
TYPO3 Workspaces typically come with three predefined stages: “Draft,” “Review,” and “Publish.” These stages represent the standard workflow for content modifications. However, you can create additional custom stages to tailor the workflow to your specific needs. Custom stages can be used to signify different levels of review, approval, or any other relevant step in your publishing process. For example, custom-created stages could be “Proof-Reading” and/or “Ready to Translate”. You can create one through “Admin Tools” > “Workspaces” > “Stages” > “Add a new Stage.”
Preparing and publishing multiple changes at once
To prepare multiple changes in TYPO3 Workspaces, you can make modifications to various elements of your website, including pages, content elements, and more. These changes can include adding new content, modifying existing content, or rearranging page structures.
Once your revisions and approvals are finalized, you are ready to publish. TYPO3 provides a straightforward mechanism in Workspaces to push all the approved changes as a single package or batch to ensure a synchronized update. Just click a button!
Content is complex; collaboration is the key
Workspaces help keep your content staging organized, productive, collaborative, and less error-prone, even with more complex content requirements or workflows. In a day and age where frequent, multi-channel, globally-understood content is becoming the norm, teams are the fuel that keep the fire of the content creation, review, and publishing process going. With Workspaces, you’re making accomplishing those task lists as easy as you can.
Let b13 help you optimize your content management workflow with TYPO3 Workspaces!
Frequently Asked Questions
What are the main benefits of using TYPO3 Workspaces?
- Content staging: TYPO3 Workspaces provide a staging environment where you can draft, review, and approve changes before they are published to the live website. This allows for controlled content updates and reduces the risk of publishing errors.
- Collaboration: Workspaces enable teams to work collaboratively on content updates. Multiple users can create and edit content simultaneously without interfering with each other’s work. This promotes teamwork and improves productivity.
- Versioning and rollbacks: Workspaces keep track of content changes, allowing you to review and compare different versions. If necessary, you can easily revert to a previous version, providing a safety net for content management and minimizing the impact of mistakes or unwanted changes.
- Content approval workflow: TYPO3 Workspaces provide a structured workflow for content approval. Content changes can be submitted for review, and designated users can review, comment, and approve or reject the changes. This helps maintain quality control and ensures that only authorized content is published.
How do TYPO3 Workspaces ensure data consistency and stability?
- Workspace Isolation: Each Workspace operates independently, isolating content changes made within the Workspace from the live website. This separation ensures that content modifications in the Workspace do not affect the stability or consistency of the live site until they are explicitly published.
- Conflict Resolution: TYPO3 offers conflict resolution mechanisms to handle conflicts that may arise when multiple users are working on the same content simultaneously. Conflicts can be identified, and users can merge or resolve conflicting changes before publishing.
Can I limit user access to specific TYPO3 Workspaces?
TYPO3 allows you to limit user access to specific Workspaces. User permissions can be configured to restrict access to specific Workspaces based on roles and responsibilities. This enables you to control which users can view, edit, or publish content within a particular Workspace.
How do I create and share preview links with my team?
To create and share preview links with your team, TYPO3 provides a “Workspace Preview” feature. You can generate a preview link for a specific Workspace, which allows authorized users to view the content changes within that Workspace without affecting the live website.
What are some best practices for using TYPO3 Workspaces effectively?
- Establish a clear content approval workflow that aligns with your organization’s processes.
- Define roles and responsibilities for users involved in Workspace management, content creation, review, and publishing.
- Regularly review and publish changes instead of keeping them in a Workspace for an extended period. Approved changes keep the live website up to date and minimize the content backlog.
- Thoroughly test the content quality and functionality to ensure it meets the desired standards before making changes live. Identify and fix any potential issues or inconsistencies.
- Foster effective communication and collaboration among team members in different Workspaces. Encourage discussions, feedback sharing, and knowledge exchange to improve the overall content quality and avoid duplication of effort.