
Better scalability with decoupled queues: How to set up RabbitMQ with TYPO3

TYPO3 v12 supports Symfony Messenger, a flexible message bus with the ability to send messages inside the application for immediate handling or through external message transport services for asynchronous handling.
In this article, we go through the steps of adding an external transport, RabbitMQ, to a TYPO3 instance.
Understanding external messaging services
Symfony Messenger supports a number of different transport types, including:
- In-memory
- Doctrine
- Redis
- AMQP
- and more.
Typically, you will want to start with the most straightforward options. The in-memory transport is perhaps the simplest one but is mainly used for testing purposes.
The Doctrine transport uses the existing database to store messages. It is often the transport of choice because it is easy to set up and requires no external dependencies.
However, Doctrine shouldn’t be your ultimate solution because using a database as a message queue does not scale well. At some point, you’ll want to use an external message queue system such as RabbitMQ or Redis—intermediaries that give your applications, microservices, and software components a common platform to exchange messages.
In this article, we focus on RabbitMQ, a very popular and mature open-source messaging broker.
Over and above the Doctrine transport built-in to TYPO3, a system like RabbitMQ has several advantages:
- It scales well. RabbitMQ can serve large numbers of message providers and consumers. Applications can connect to each other, as components of a larger application, or to user devices and data. The workload can be distributed across multiple processes.
- Support for distributed systems. RabbitMQ can run message brokers on multiple nodes to distribute workload to a network of services and route messages between producers and consumers.
- Fault-tolerant by design. Messages are stored in a queue until they get consumed. The queue can absorb load spikes and store messages in case one or more consumers are temporarily unavailable.
Those advantages make it worth investing time to set up an external message transport for TYPO3. If you want to try out RabbitMQ, read on to see how to create a DDEV-based message queue project.
How to set up RabbitMQ in TYPO3 with DDEV
Let’s start from a blank slate. For this exercise, we’re going to use Docker and DDEV, and the GitLab TYPO3 site package, so you’ll need a GitLab account. The GitLab TYPO3 site package is a project template ready for building a site package on top of a clean TYPO3 installation.
Install Docker and DDEV
DDEV manages containerized PHP development environments and lets you set up a project in seconds.
Follow the DDEV installation instructions to install both Docker and DDEV.
For the setup also see the documentation on DDEV.
Set up a TYPO3 Site
The TYPO3 Distribution template in GitLab is an easy way of setting up a TYPO3 site including a blank site package.
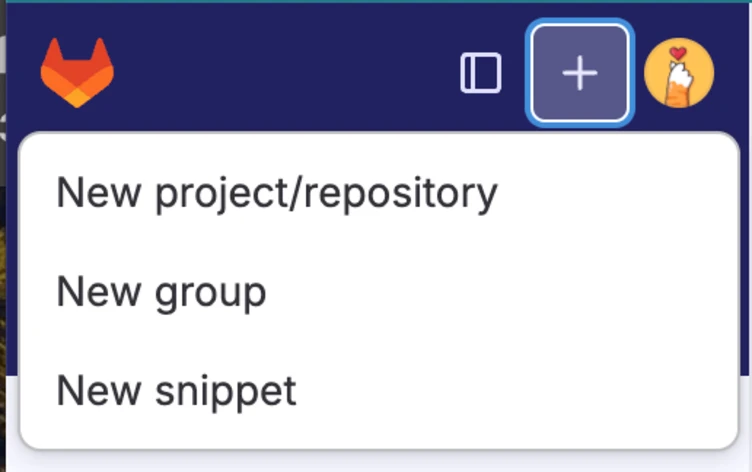
1. Log in to GitLab
2. In the top-left corner, click the plus + button and select New project/repository.
3. Select Create from template.
4. In the list of templates, scroll down to “TYPO3 Distribution” then click Use template.

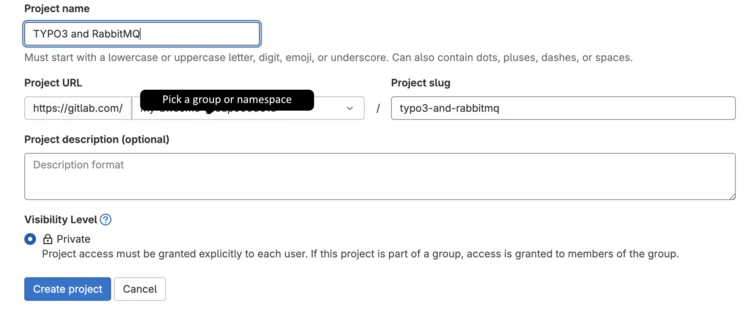
5. In the template form, enter the name “TYPO3 and RabbitMQ”. Choose a group or namespace, then click Create project.
6. When the project is created, open a local shell on your system and clone the repository to a local folder.
7. CD into the project and initialize TYPO3.
1
2
3
cd typo3-and-rabbitmq

ddev typo3-init
This command builds the initial project and starts Docker containers with a Web server and a database inside.
When the command is finished, it prints the login credentials to the terminal and opens the login page in the browser.
8. Log in to test that TYPO3 runs fine. If the login page does not open automatically, open it at the path /TYPO3. Based on the GitLab details from step 5, the login URL would be “https://typo3-and-rabbitmq.ddev.site/typo3”.
Install RabbitMQ
Now you can install RabbitMQ via DDEV.
1.In the shell, run
1
ddev get b13/ddev-rabbitmq
2. Add these lines to your .ddev/config.yaml:
1
webimage_extra_packages: ["php${DDEV_PHP_VERSION}-amqp"]
AMQP is the message protocol that RabbitMQ uses. The webimage_extra_packages ensures that the amqp package is installed.
3. Now restart your containers to apply the change:
1
ddev restart
This may take a few seconds.
4. Run ddev describe to see if RabbitMQ is installed. The command reveals the URL of the RabbitMQ service.
Install AMQP support for the Symfony Messenger
RabbitMQ uses the AMPQ protocol, so we move on to setting up AMQP for the Symfony Messenger.
1. Install the symfony/messenger package:
1
ddev composer req symfony/amqp-messenger:^6.4
2. TYPO3 needs to know how to talk to the RabbitMQ service. To achieve this, edit the file in packages/site-distribution/Configuration/Services.yaml as follows (make sure you preserve the indentation):
1
2
3
4
5
6
7
8
9
10
11
12
13
14
15
16
17
18
19
20
21
22
23
24
25
26
27
28
29
30
31
32
33
34
35
36
37
services:
  _defaults:
    autowire: true
    autoconfigure: true
    public: true

  Site\Distribution\:
    resource: "../Classes/*"
    exclude: "../Classes/Domain/Model/*"

  Site\Distribution\Queue\Handler\MyHandler:
    tags:
      - name: "messenger.message_handler"

  Site\Distribution\Queue\Message\MyMessage:
    arguments:
      $content: 'Default content'

  # RabbitMQ
  Symfony\Component\Messenger\Bridge\Amqp\Transport\AmqpTransportFactory:
    public: true

  Symfony\Component\Messenger\Bridge\Amqp\Transport\AmqpTransport:
    factory:
      [
        '@Symfony\Component\Messenger\Bridge\Amqp\Transport\AmqpTransportFactory',
        "createTransport",
      ]
    arguments:
      $dsn: "amqp://rabbitmq:rabbitmq@rabbitmq:5672/%2f/queue"
      $options: {}
    tags:
      - name: "messenger.sender"
        identifier: "amqp"
      - name: "messenger.receiver"
        identifier: "amqp"
Note the $dsn argument that holds the connection string. When deploying to production, you will want to adjust its parameters accordingly. This is the canonical form of the AMQP DSN:
1
amqp://<username>:<password>@rabbitmq:5672/<virtual host>/<queue name>
Create a message class
For dispatching and processing a message, you need a message class. A very simple version of a message class is the following, which you can create in Classes/Queue/Message/MyMessage.php:
1
2
3
4
5
6
7
8
9
10
11
12
13
<?php

declare(strict_types=1);

namespace Site\Distribution\Queue\Message;

final class MyMessage
{
	public function __construct(
    	public readonly string $content
	) {
	}
}
3. The MyMessage class needs to be wired to asynchronous transport via AMQP. Edit the packages/site-distribution/ext_localconf.php file accordingly:
1
2
3
4
5
6
7
8
9
10
11
12
13
14
15
16
17
18
19
20
21
22
23
24
25
26
<?php

declare(strict_types=1);

use Site\Distribution\Queue\Message\MyMessage;
use TYPO3\CMS\Core\Messaging\WebhookMessageInterface;

defined('TYPO3') or die();

// Include vite generated manifest file (global)
$GLOBALS['TYPO3_CONF_VARS']['EXTENSIONS']['vite_asset_collector']['defaultManifest'] = 'EXT:site-distribution/Resources/Public/Vite/.vite/manifest.json';

// Include custom RTE config
$GLOBALS['TYPO3_CONF_VARS']['RTE']['Presets']['default'] = 'EXT:site-distribution/Configuration/RTE/RteDefaultPreset.yaml';

// Unset the default, so that it no longer applies
unset($GLOBALS['TYPO3_CONF_VARS']['SYS']['messenger']['routing']['*']);

// Set Webhook-Messages and MyMessage to asynchronous transport via amqp
foreach ([WebhookMessageInterface::class, MyMessage::class] as $className) {
    $GLOBALS['TYPO3_CONF_VARS']['SYS']['messenger']['routing'][$className] = 'amqp';
}

$GLOBALS['TYPO3_CONF_VARS']['SYS']['messenger']['config']['amqp'] = [
    'dsn' => 'amqp://rabbitmq:rabbitmq@rabbitmq:5672/%2f/messages',
];
Set up a message handler class
A message handler receives and processes messages from the RabbitMQ broker. It does not actively reach out to the broker but rather relies on a consumer process that reads each message and passes it to the message handler.
Here is a simple version of a message handler that you can create in packages/site-distribution/Classes/Queue/Handler/MyHandler.php:
1
2
3
4
5
6
7
8
9
10
11
12
13
14
15
16
17
18
19
20
21
22
23
24
25
26
27
28
29
30
<?php

declare(strict_types=1);

namespace Site\Distribution\Queue\Handler;

use Site\Distribution\Queue\Message\MyMessage;
use Symfony\Component\Messenger\Envelope;
use Symfony\Component\Messenger\MessageBusInterface;
use Symfony\Component\Messenger\Stamp\DelayStamp;

final class MyHandler
{
	public function __construct(private readonly MessageBusInterface $bus)
	{
	}

	public function __invoke(MyMessage $message): void
	{
		try {

			// Process $message

		} catch (\Exception $exception) {
			// Workaround to support infinite retryable messages. So no message gets lost.
			$envelope = new Envelope(new MyMessage($message->content), [new DelayStamp(5000)]);
			$this->bus->dispatch($envelope);
		}
	}
}
Test the message queue
Now it is time to test the queue. An easy way to feed messages into the queue is to set up a middleware that triggers on every page load.
1. Add a class “RunTheRabbit” that implements the MiddlewareInterface to packages/site-distribution/Classes/Middleware/RunTheRabbit.php:
1
2
3
4
5
6
7
8
9
10
11
12
13
14
15
16
17
18
19
20
21
22
23
24
25
26
27
28
29
30
<?php

declare(strict_types=1);

namespace Site\Distribution\Middleware;

use Psr\Http\Message\ResponseInterface;
use Psr\Http\Message\ServerRequestInterface;
use Psr\Http\Server\MiddlewareInterface;
use Psr\Http\Server\RequestHandlerInterface;
use Site\Distribution\Queue\Message\MyMessage;
use Symfony\Component\Messenger\MessageBusInterface;

class RunTheRabbit implements MiddlewareInterface
{
    public function __construct(private readonly MessageBusInterface $bus)
    {
    }

    public function process(
        ServerRequestInterface $request,
        RequestHandlerInterface $handler
    ): ResponseInterface {
        $content = 'Some important content';
        $this->bus->dispatch(new MyMessage($content));

        return $handler->handle($request);
    }
}
2. To register the middleware, create the file packages/site-distribution/Configuration/RequestMiddlewares.php and add the following code:
1
2
3
4
5
6
7
8
9
10
11
12
13
14
15
<?php
return [
    'frontend' => [
        'site-rabbit' => [
            'target' => \Site\Distribution\Middleware\RunTheRabbit::class,
            'after' => [
                'TYPO3/cms-frontend/authentication',
            ],
            'before' => [
                'TYPO3/cms-frontend/base-redirect-resolver',
            ],
        ],
    ],
];
3. It’s time to test! Restart TYPO3 to apply all changes:
1
ddev restart
4. Verify if all services are up and running:
1
ddev describe
You should see an “OK” for the web, db, and rabbitmq services.
5. You need to start a consumer to read the messages that RunTheRabbit sends to the queue. For ease of testing, you can use this one-liner:
1
ddev TYPO3 messenger:consume -vv amqp
The -vv flag causes the consumer to log its actions to the terminal.
6. Now open the TYPO3 frontend. Every time you open or reload a page in the frontend, you will see this message in the terminal:
1
[info] Site\Distribution\Queue\Message\MyMessage was handled successfully (acknowledging to transport).
Congratulations! You have successfully set up RabbitMQ messaging with TYPO3.
Conclusion: Message queues and TYPO3 are a great team
Setting up message queues with TYPO3 has become much more straightforward in v12. With a few steps, you were able to set up and integrate RabbitMQ with TYPO3. Now there are no more reasons to be worried about growing numbers of visitors at your site. If certain popular services, like PDF generation or zipping files for download, start consuming too much CPU power, you can outsource these tasks to asynchronous workers on different nodes, thanks to the new message queue integration.
If you need help or services around implementing message queues, contact us!