---
title: How to Create Custom Forms with the TYPO3 Form Extension
url: "https://b13.com/knowledge/create-custom-forms-with-typo3"
description: Forms are a must-have on any website these days; from a simple contact form to a complex multi-page form for data processing. TYPO3 CMS’s built-in form functionality has all the answers.
image: "https://b13.com/fileadmin/_processed_/3/0/csm_forms_191-1_3ae9454904.jpg"
date: 2021-04-22
modified: 2026-08-19
lastUpdated: 2026-08-19
---

# How to Create Custom Forms with the TYPO3 Form Extension

[ Forms ](https://b13.com/knowledge/forms) [ UX/UI-Design ](https://b13.com/knowledge/uxui-design) [ TYPO3 ](https://b13.com/knowledge/typo3)

 Showcasing the flexibility of TYPO3’s Form Framework
======================================================

 Let us inspire you to fit it to your own design

![](https://b13.com/fileadmin/_processed_/a/d/csm_david_5ce18d41e2.jpg)David Steeb

  28 April 2021

 [ RSS Feed ](https://b13.com/rss.xml)

  ![Two figures are assembling large yellow elements around a blank screen, suggesting a collaborative design or construction process. The background features abstract shapes in various colors, enhancing the creative atmosphere.](https://b13.com/fileadmin/_processed_/5/9/csm_forms_41d7ebc853.webp)

Embedding forms into a website is a basic requirement when selecting a content management system (CMS) today. Requirements for working with forms can range from simple to complex. Perhaps you want to add a contact form to the contact page or embed a form from a third-party application like Hubspot or Salesforce; or maybe you need to enable your marketers and editors to create custom forms on the spot within the CMS. Luckily for us, TYPO3 CMS comes with the system extension “form” that can handle almost any usage scenario you can think of. One of the main benefits being that editors can create forms with just a few clicks.

  The “form” system extension is highly configurable, offering an enormous array of options, configuration settings, and templates. This sort of flexibility can be daunting, but don’t worry. We’re going to talk you through how we implemented forms on the [TYPO3 Demo website](https://demo.typo3.org/) so you can get a feel for what’s under the hood and how to adapt it to your own needs.

If you’re familiar with the Bootstrap framework, you’ll probably be able to get started creating forms that look okay out-of-the-box. This is because the form extension comes with a set of templates (and a concept for their use) that draws from the Bootstrap framework. If not, then you will need to dive into setting up TYPO3’s form extension with your own templates, according to your own use case and configuration requirements. At b13, we prefer to work with custom markup, CSS, and JavaScript because it is easier to maintain in the long run.

   TYPO3’s form extension: What’s in the box?
--------------------------------------------

 Let’s take a look at what’s included with TYPO’s core extension “form”:

- Create forms in all shapes and sizes, from simple contact forms with a few fields to multi-page forms including complex validation, custom form data processing, and more
- Editors can create forms from scratch or based upon included or custom-built example form definitions you provide yourself
- Form comes with around 20 field types and a set of commonly used, powerful validators to give you full flexibility to build custom forms
- A form filled out in the frontend can be processed using one or multiple so-called “form finishers” for sending an email, saving form fields to the database, saving uploaded files to the file system, etc.
- All form definitions are saved using a YAML configuration file under the hood, making it possible to create forms and deploy across servers, multiple TYPO3 instances, and reuse form configurations across multiple projects or for similar forms in a multi-site setup

   TYPO3’s form extension: When to use it?
-----------------------------------------

At b13 we have projects where we use this extension in multiple ways and various places. We have projects where we use the extension as a basis for a simple contact form—and remove most of the other features (or just hide the form editor from regular editors). We also work with solutions like custom built mini-extensions that just save some data to the database.

  ###  Example use case: Editors create and edit forms

TYPO’s form extension is great for when your editors need freedom to create and change forms. They can add or remove fields, as well as change labels and descriptions inside a form.

  ###  Example use case: Editors choose predefined forms

Say you need one contact form that sends out emails to a customer service email address, and you don’t want anyone to change it. You can use the extension to create that form and save the configuration into your version control. This means you can remove the form editor from your backend users so that they only work with predefined forms—giving you a tightly integrated, regularly upgraded form extension. The form extension is maintained by TYPO3’s Core team, which means it is regularly updated.

  ###  Example use case: Forms integrate with other systems

Perhaps you want to build a contact form that is integrated with or exports to external systems. With this type of specific workflow, you won’t want anyone to change the structure or placement of the form. In this instance you might opt to create a small, custom-built extension for that specific use case. Sometimes it’s easier to create a form with a single template that fits your design and requirements instead of changing lots of Fluid partials, and messing with CSS class configuration and error handling.

   How to configure TYPO3’s form extension to your needs
-------------------------------------------------------

On the official TYPO3 Demo website, we recently added form features as a showcase of what you can do with forms in TYPO3. We wanted to create a simple contact form as an example, and also show the form editor’s capabilities, so that people can test out what is possible with this module. To make sure we met all our internal requirements and had a consistent layout and design, we needed to install the form extension and customize the setup. Our requirements:

- Use our own, custom templates for forms, with custom markup
- Prepare a default contact form, that is not editable (but may be used as a preset for creating new forms)
- Remove field types we did not customize for this project
- Remove finishers from the system (we do not want the TYPO3 Demo project to turn into a spam machine sending out emails left and right)
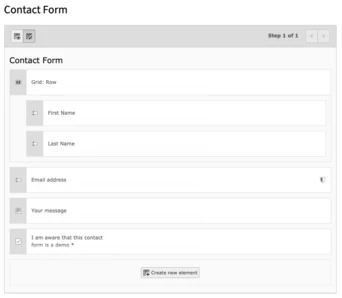
  ![This is the editor’s view in the backend.](https://b13.com/fileadmin/_processed_/5/1/csm_Forms_1_editors_view_219c66596c.webp)  The official TYPO3 demo site contains a simple contact form as an example. This is the editor’s view in the backend.
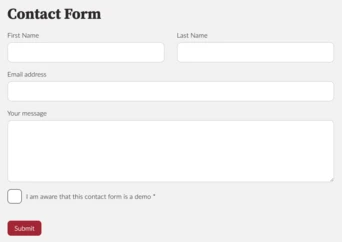
    ![Frontend output of our form](https://b13.com/fileadmin/_processed_/7/1/csm_Forms_2_frontend_output_d561f83b3f.webp)  The contact form as presented in the frontend output

  ###  Install form extension and prepare your system

To install TYPO3’s form extension,load the extension and add it to your system. We use composer to do so:

`composer req typo3/cms-form`

Alternatively, you can use the Extension Manager to install Form Framework and activate the “Form” extension.

You will see the form module icon in the backend module menu. Add the extension’s TypoScript setup to your site extension package to enable frontend output for forms:

`@import 'EXT:form/Configuration/TypoScript/setup.typoscript'`

In the steps to follow we want to change the default configuration to fit our requirements. We want to use our own template files for form templates and add the following TypoScript to our setup:

  ```
1<br></br>2<br></br>3<br></br>4<br></br>5<br></br>6<br></br>7<br></br>8<br></br>9<br></br>10<br></br>11<br></br>12<br></br>13<br></br>14<br></br>15<br></br>
```

```
plugin.tx_form {<br></br> <span class="hljs-built_in"> settings </span>{<br></br>    yamlConfigurations {<br></br>      100 = EXT:site_t3demo/Configuration/Yaml/FormSetup.yaml<br></br>    }<br></br>  }<br></br>}<br></br><br></br>module.tx_form {<br></br> <span class="hljs-built_in"> settings </span>{<br></br>    yamlConfigurations {<br></br>      100 = EXT:site_t3demo/Configuration/Yaml/FormSetup.yaml<br></br>    }<br></br>  }<br></br>}<br></br>
```

  You might be confused looking at this because it seems redundant: the `plugin.tx_form` key registers our FormSetup.yaml file for frontend rendering of the forms, while `module.tx_form` announces our YAML file to be taken into account within the backend form editor module.

  ###  Note

Configuration for forms is done in YAML files, as opposed to what you might be used to from most other plugins in TYPO3. The reason is that YAML can be used agnostic of backend and frontend configuration, which is typically done via PageTsConfig and TypoScript respectively.

  ###  Customize form templates

Next, we created an example form using the form module that includes all the field types we wanted to make available for use by editors and marketers within the TYPO3 backend. This involves creating a new form (using the form module) and adding that form to a page in our page tree (using the form content element) to see that form in our website’s frontend.

All form elements (the form itself, fieldsets, and all individual elements) are rendered using default Fluid Templates and Partials you will find within the folder `sysext/form/Resources/Private/Frontend`. So, to change a template to fit our desired markup we added our own template for each element within our site extension package folders. We use the folder `Resources/Private/Plugins/Form/` inside our site extension package.

To make form use these templates, we add the Fluid paths to the FormSetup.yaml, like this:

  ```
1<br></br>2<br></br>3<br></br>4<br></br>5<br></br>6<br></br>7<br></br>8<br></br>9<br></br>10<br></br>11<br></br>12<br></br>13<br></br>14<br></br>
```

```
<span class="hljs-attr">TYPO3:</span><br></br>  <span class="hljs-attr">CMS:</span><br></br>    <span class="hljs-attr">Form:</span><br></br>      <span class="hljs-attr">prototypes:</span><br></br>        <span class="hljs-attr">standard:</span><br></br>          <span class="hljs-attr">formElementsDefinition:</span><br></br>            <span class="hljs-attr">Form:</span><br></br>              <span class="hljs-attr">renderingOptions:</span><br></br>                <span class="hljs-attr">templateRootPaths:</span><br></br>                  <span class="hljs-attr">20:</span> <span class="hljs-string">'EXT:site_t3demo/Resources/Private/Plugins/Form/Templates/'</span><br></br>                <span class="hljs-attr">partialRootPaths:</span><br></br>                  <span class="hljs-attr">20:</span> <span class="hljs-string">'EXT:site_t3demo/Resources/Private/Plugins/Form/Partials/'</span><br></br>                <span class="hljs-attr">layoutRootPaths:</span><br></br>                  <span class="hljs-attr">20:</span> <span class="hljs-string">'EXT:site_t3demo/Resources/Private/Plugins/Form/Layouts/'</span><br></br>
```

  A typical partial for a form field, like a simple text input, could look like this:

  ```
1<br></br>2<br></br>3<br></br>4<br></br>5<br></br>6<br></br>7<br></br>8<br></br>9<br></br>10<br></br>11<br></br>12<br></br>13<br></br>14<br></br>15<br></br>16<br></br>17<br></br>
```

```
<html<br></br>  xmlns:f=<span class="hljs-string">"http://typo3.org/ns/TYPO3/CMS/Fluid/ViewHelpers"</span><br></br>  xmlns:formvh=<span class="hljs-string">"http://typo3.org/ns/TYPO3/CMS/Form/ViewHelpers"</span><br></br>  data-namespace-typo3-fluid=<span class="hljs-string">"true"</span><br></br>><br></br><span class="xml"><span class="hljs-tag"><<span class="hljs-name">formvh:renderRenderable</span> <span class="hljs-attr">renderable</span>=<span class="hljs-string">"{element}"</span>></span><br></br>  </span><span class="xml"><span class="hljs-tag"><<span class="hljs-name">f:render</span> <span class="hljs-attr">partial</span>=<span class="hljs-string">"Field/Field"</span> <span class="hljs-attr">arguments</span>=<span class="hljs-string">"{element: element}"</span> <span class="hljs-attr">contentAs</span>=<span class="hljs-string">"elementContent"</span>></span><br></br>    <span class="hljs-tag"><<span class="hljs-name">f:form.textfield</span><br></br>      <span class="hljs-attr">property</span>=<span class="hljs-string">"</span></span></span><span class="xquery">{<span class="hljs-keyword">element</span>.identifier}</span><span class="xml"><span class="hljs-tag"><span class="hljs-string">"</span><br></br>      <span class="hljs-attr">id</span>=<span class="hljs-string">"</span></span></span><span class="xquery">{<span class="hljs-keyword">element</span>.uniqueIdentifier}</span><span class="xml"><span class="hljs-tag"><span class="hljs-string">"</span><br></br>      <span class="hljs-attr">class</span>=<span class="hljs-string">"b_form__text </span></span></span><span class="xquery">{<span class="hljs-keyword">element</span>.properties.elementClassAttribute}</span><span class="xml"><span class="hljs-tag"><span class="hljs-string">"</span><br></br>      <span class="hljs-attr">errorClass</span>=<span class="hljs-string">"</span></span></span><span class="xquery">{<span class="hljs-keyword">element</span>.properties.elementErrorClassAttribute}</span><span class="xml"><span class="hljs-tag"><span class="hljs-string">"</span><br></br>      <span class="hljs-attr">additionalAttributes</span>=<span class="hljs-string">"</span></span></span><span class="xquery">{formvh:translateElementProperty(<span class="hljs-keyword">element</span>: <span class="hljs-keyword">element</span>, property: 'fluidAdditionalAttributes')}</span><span class="xml"><span class="hljs-tag"><span class="hljs-string">"</span><br></br>    /></span><br></br>  <span class="hljs-tag"></<span class="hljs-name">f:render</span>></span></span><span class="xml"><br></br><span class="hljs-tag"></<span class="hljs-name">formvh:renderRenderable</span>></span></span><br></br></html><br></br>
```

  So, by adding Fluid templates to our site extension, little by little the form markup can be changed to fully fit our requirements for markup and structure. You can change the way fields, in general, are rendered (if you want to change the position of error messages, for example), or change individual markup for all bits and pieces, like the “mandatory field” indicator.

   Use predefined form configurations
------------------------------------

In the Demo project, we wanted editors to be able to copy forms, but not edit or delete them. To make a form available to editors for use only, or as a basis to copy custom forms from, you can add a form configuration YAML file to your site extension package. The simplest way to do so is by creating a form with the form editor, saving your configuration, and then moving the file you created from the default path in your `fileadmin` directory to your extension directory. Make that directory known to your form configuration setup in your `FormSetup.yaml` file to be able to use forms you deploy with your site package:

  ```
1<br></br>2<br></br>3<br></br>4<br></br>5<br></br>6<br></br>
```

```
<span class="hljs-attr">TYPO3:</span><br></br>  <span class="hljs-attr">CMS:</span><br></br>    <span class="hljs-attr">Form:</span><br></br>      <span class="hljs-attr">persistenceManager:</span><br></br>        <span class="hljs-attr">allowedExtensionPaths:</span><br></br>          <span class="hljs-attr">10:</span> <span class="hljs-string">EXT:site_t3demo/Resources/Private/Plugins/Form/Forms/</span><br></br>
```

   Advanced configuration
------------------------

For the Demo project, once we had the form looking the way we wanted, we didn’t want editors to be able to change it. So let’s look at optimizing the configuration to make sure editors won’t use field types you did not customize, or use finishers you do not want them to use. This is done using the aforementioned YAML file. If you look inside the Configuration folder for TYPO3’s form extension you will find a lot of configuration split into different YAML files, that define the default behavior of all forms and form fields. If you want to change something, find the key within these files and then add the changed configuration to your own setup.

  ###  Remove field types you don’t need

In our example, we wanted to remove the field types “File Upload”, “Image Upload”, “Advanced Password”, “Date Picker”, and “Content Element”, all of which we deemed not needed for testing and demonstrating purposes. Here’s how we removed these form elements from the form editor for all backend users:

  ```
1<br></br>2<br></br>3<br></br>4<br></br>5<br></br>6<br></br>7<br></br>8<br></br>9<br></br>10<br></br>11<br></br>12<br></br>
```

```
<span class="hljs-attr">TYPO3:</span><br></br>  <span class="hljs-attr">CMS:</span><br></br>    <span class="hljs-attr">Form:</span><br></br>      <span class="hljs-attr">prototypes:</span><br></br>        <span class="hljs-attr">standard:</span><br></br>          <span class="hljs-attr">formElementsDefinition:</span><br></br>            <span class="hljs-comment"># remove field types we do not show or have no custom template/styling for</span><br></br>            <span class="hljs-attr">FileUpload:</span> <span class="hljs-literal">null</span><br></br>            <span class="hljs-attr">ImageUpload:</span> <span class="hljs-literal">null</span><br></br>            <span class="hljs-attr">AdvancedPassword:</span> <span class="hljs-literal">null</span><br></br>            <span class="hljs-attr">DatePicker:</span> <span class="hljs-literal">null</span><br></br>            <span class="hljs-attr">ContentElement:</span> <span class="hljs-literal">null</span><br></br>
```

    ![New element options](https://b13.com/fileadmin/_processed_/7/9/csm_Forms_3_new_element_options_eeef18152f.webp)  After adding our configuration the “New element” options only show the fields we want editors to use.

  ###  Remove or change configuration options from a field type

Next, we wanted to change the “Grid row” configuration: Our design called for a maximum of two columns, non-configurable and with a fixed responsive behavior. So there was no point in having responsive bootstrap-grid-size-options displayed for editors that did nothing and would just confuse users. By removing three of the four viewPorts from the configuration and setting a fixed CSS class name we could configure the default template to fit our needs without adding our own template.

  ```
1<br></br>2<br></br>3<br></br>4<br></br>5<br></br>6<br></br>7<br></br>8<br></br>9<br></br>10<br></br>11<br></br>12<br></br>13<br></br>14<br></br>15<br></br>16<br></br>17<br></br>
```

```
<span class="hljs-attr">TYPO3:</span><br></br>  <span class="hljs-attr">CMS:</span><br></br>    <span class="hljs-attr">Form:</span><br></br>      <span class="hljs-attr">prototypes:</span><br></br>        <span class="hljs-attr">standard:</span><br></br>          <span class="hljs-attr">formElementsDefinition:</span><br></br>            <span class="hljs-comment"># reset the grid class to only use 2 or 1 column</span><br></br>            <span class="hljs-attr">GridRow:</span><br></br>              <span class="hljs-attr">properties:</span><br></br>                <span class="hljs-attr">elementClassAttribute:</span> <span class="hljs-string">'b_form__row'</span><br></br>                <span class="hljs-attr">gridColumnClassAutoConfiguration:</span><br></br>                  <span class="hljs-attr">viewPorts:</span><br></br>                    <span class="hljs-attr">xs:</span><br></br>                      <span class="hljs-attr">classPattern:</span> <span class="hljs-string">'b_form__col'</span><br></br>                    <span class="hljs-attr">sm:</span> <span class="hljs-literal">null</span><br></br>                    <span class="hljs-attr">md:</span> <span class="hljs-literal">null</span><br></br>                    <span class="hljs-attr">lg:</span> <span class="hljs-literal">null</span><br></br>
```

  Next, other field types also have configuration options for responsive behavior, where an editor can set the display width for certain breakpoints. Again, our design was more restrictive and these options were not needed, so we removed these settings from the text field type by removing the “editors” key with index “700” (see the original YAML file inside `sysext/form` to find the original configuration).

  ```
1<br></br>2<br></br>3<br></br>4<br></br>5<br></br>6<br></br>7<br></br>8<br></br>9<br></br>10<br></br>11<br></br>
```

```
<span class="hljs-attr">TYPO3:</span><br></br>  <span class="hljs-attr">CMS:</span><br></br>    <span class="hljs-attr">Form:</span><br></br>      <span class="hljs-attr">prototypes:</span><br></br>        <span class="hljs-attr">standard:</span><br></br>          <span class="hljs-attr">formElementsDefinition:</span><br></br>            <span class="hljs-comment"># remove responsive options/field width from text input fields (not used)</span><br></br>            <span class="hljs-attr">Text:</span><br></br>              <span class="hljs-attr">formEditor:</span><br></br>                <span class="hljs-attr">editors:</span><br></br>                  <span class="hljs-attr">700:</span> <span class="hljs-literal">null</span><br></br>
```

  If you want to remove a finisher from the default setup (in our case we wanted to remove the options for sending emails of any kind using any finisher) you can remove finishers from your setup in a similar way:

  ```
1<br></br>2<br></br>3<br></br>4<br></br>5<br></br>6<br></br>7<br></br>8<br></br>9<br></br>10<br></br>11<br></br>12<br></br>13<br></br>14<br></br>15<br></br>16<br></br>17<br></br>
```

```
<span class="hljs-attr">TYPO3:</span><br></br>  <span class="hljs-attr">CMS:</span><br></br>    <span class="hljs-attr">Form:</span><br></br>      <span class="hljs-attr">prototypes:</span><br></br>        <span class="hljs-attr">standard:</span><br></br>          <span class="hljs-attr">formElementsDefinition:</span><br></br>            <span class="hljs-attr">Form:</span><br></br>              <span class="hljs-attr">formEditor:</span><br></br>                <span class="hljs-attr">editors:</span><br></br>                  <span class="hljs-attr">900:</span><br></br>                    <span class="hljs-comment"># remove finishers not needed or wanted for demo project</span><br></br>                    <span class="hljs-attr">selectOptions:</span><br></br>                      <span class="hljs-comment"># email finishers: we do not want to send out any emails</span><br></br>                      <span class="hljs-attr">20:</span> <span class="hljs-literal">null</span><br></br>                      <span class="hljs-attr">30:</span> <span class="hljs-literal">null</span><br></br>                      <span class="hljs-comment"># "delete upload": no file uploads possible</span><br></br>                      <span class="hljs-attr">50:</span> <span class="hljs-literal">null</span><br></br>
```

  ###  Check out the TYPO3 Demo website to see how we implemented forms.

<https://demo.typo3.org/contact>

   Dive into the code for more configuration options
---------------------------------------------------

These examples are enough to get you started, or to provide basic, working form configurations for your websites. You can enable or disable form definitions folders to completely remove options for editors to change your default form definitions; you can add your own form finishers to process data your users enter into your form, add your own field types, and much more. A good way to do that in our experience is to look into the code to see how things are done for everything shipping with the default setup, and then start working from there. There’s a number of YAML and Fluid files shipped with the form extension, and once you’re comfortable with browsing through these files you will find what you’re looking for, and therefore will be able to change, remove, or expand on what is provided by default.

   Get in touch with us if you need help implementing your own forms or have a use case that requires a tailored solution.
-------------------------------------------------------------------------------------------------------------------------

If you’ve built an amazing form, we’d love to hear about it!

 [ Let’s connect ](https://b13.com/lets-connect)

  ###  Written by:

 ![Bild von David Steeb](https://b13.com/fileadmin/_processed_/a/d/csm_david_cf042ebb7f.webp)

b13 Founder and CEO, David, is someone you’ll meet if you’re thinking about working with our agency. He is constantly learning new skills and is an influential part of our cutting-edge frontend practice.

 David Steeb  CEO

 [ more from David Steeb ](https://b13.com/team/david-steeb)

  Related Articles
------------------

- ![Cartoon trophy character surrounded by hands giving thumbs up and a heart gesture, set against a gear-patterned background.](https://b13.com/fileadmin/_processed_/f/7/csm_T3ppy_Design_Kit_Headerbild_b51eb9dc31.webp)

    ###  T3ppy Gives TYPO3 a Friendly Face

     06 August 2026 | Florian “Flix” Keitgen

     TYPO3 is powerful—but it doesn’t have to feel impersonal. Meet T3ppy, our friendly companion for the backend.

     [ Read more: T3ppy Gives TYPO3 a Friendly Face ](https://b13.com/knowledge/t3ppy-design-kit)
- ![Gavel labeled "AI" on a circuit-patterned background with yellow stars, symbolizing regulation or legislation related to artificial intelligence in the EU.](https://b13.com/fileadmin/_processed_/1/0/csm_EUAIAct_Headerbild_510724b3de.webp)

    ###  AI Content in TYPO3: Labelling Needs Accountability

     02 August 2026 | Benni Mack

     The EU AI Act brings the origins of AI-generated content into focus. AI Label marks AI-generated and AI-edited content in TYPO3 and records who signed off the published version—for…

     [ Read more: AI Content in TYPO3: Labelling Needs Accountability ](https://b13.com/knowledge/ai-content-in-typo3-labelling-needs-accountability)
- ![A robotic hand holds a paintbrush, creating a purple swirl against a light blue background with circular patterns.](https://b13.com/fileadmin/_processed_/b/d/csm_DesignAndKI_Headerbild_bd966b1d32.webp)

    ###  Designing Responsibly in the Age of AI: What We’re Learning as We Go

     17 July 2026 | Laura Heine

     Laura Heine shares what she learned at the Design Leadership Meetup about responsibility, documentation, and treating AI fairly as a team.

     [ Read more: Designing Responsibly in the Age of AI: What We’re Learning as We Go ](https://b13.com/knowledge/designing-responsibly-in-the-age-of-ai-what-were-learning-as-we-go)
- ![A series of stylized figures in various poses, each with a distinctive orange hat, depict a progression from walking to standing still while looking at a phone, set against a purple grid background.](https://b13.com/fileadmin/_processed_/d/7/csm_QueuesDDEV_Headerbild_f640931350.webp)

    ###  Better scalability with decoupled queues: How to set up RabbitMQ with TYPO3

     10 April 2024 | Jochen Roth

     When built-in message transports hit their limits, RabbitMQ can provide TYPO3 with a scalable, robust message queue.

     [ Read more: Better scalability with decoupled queues: How to set up RabbitMQ with TYPO3 ](https://b13.com/knowledge/better-scalability-with-decoupled-queues-how-to-set-up-rabbitmq-with-typo3)
- ![A cartoon character resembling a shield gives a thumbs up in front of a computer interface with various menu options.](https://b13.com/fileadmin/_processed_/e/6/csm_Header_cda1f80173.webp)

    ###  Meet T3ppy: A New Era for Editorial Work in TYPO3

     01 April 2026 | Florian “Flix” Keitgen

     T3ppy and the AiM extension bring AI directly into the TYPO3 backend—enhancing SEO, content quality, and workflows with centralized control.

     [ Read more: Meet T3ppy: A New Era for Editorial Work in TYPO3 ](https://b13.com/knowledge/meet-t3ppy-a-new-era-for-editorial-work-in-typo3)
- ![Retro microphone illustration with a shopping cart icon in the background, symbolizing e-commerce or online shopping.](https://b13.com/fileadmin/_processed_/f/8/csm_Marketplace_Headerbild_ee1575614c.webp)

    ###  Why TYPO3 Needs a Marketplace for Products

     25 March 2026 | Florian “Flix” Keitgen

     A marketplace would make TYPO3 products more discoverable, easier to compare, and benefit both agencies and clients alike.

     [ Read more: Why TYPO3 Needs a Marketplace for Products ](https://b13.com/knowledge/why-typo3-needs-a-marketplace-for-products)
- ![A hand holding a magnifying glass over a laptop screen displaying a webpage with an image and text elements.](https://b13.com/fileadmin/_processed_/e/5/csm_BackendUserSection_Headerbild_6093c842fd.webp)

    ###  Unlocking TYPO3’s Hidden Gem: The Backend User Section (Doktype 6)

     05 March 2026 | David Steeb

     Discover TYPO3’s underrated doktype 6 (Backend User Section) for secure internal previews, editor training, and prototyping. Learn real use cases, common pitfalls like 403 errors…

     [ Read more: Unlocking TYPO3’s Hidden Gem: The Backend User Section (Doktype 6) ](https://b13.com/knowledge/backend-user-section-in-typo3-uses-pitfalls-helper)
- ![Two stylized web page designs featuring a user profile, image placeholders, and text sections, set against a light blue background.](https://b13.com/fileadmin/_processed_/2/0/csm_BackendPreview_Headerbild_b4c5799cfa.webp)

    ###  Backend Previews With a System—Why We Built EXT:backendpreviews

     09 February 2026 | David Steeb

     EXT:backendpreviews brings structure and consistency to content previews in the TYPO3 backend using Fluid templates, layouts, and partials.

     [ Read more: Backend Previews With a System—Why We Built EXT:backendpreviews ](https://b13.com/knowledge/backend-previews-with-a-system-why-we-built-extbackendpreviews)
- ![A human hand shakes a robotic hand against a purple background with heart patterns, symbolizing collaboration between humans and technology.](https://b13.com/fileadmin/_processed_/6/2/csm_AIbotsLoveMarkdown_Headerbild_72fe5820d6.webp)

    ###  The Internet Is No Longer Just for Humans—AI Bots Love Markdown

     28 January 2026 | Benni Mack

     Discover why most web traffic is now automated and how TYPO3’s structured content model prepares websites for humans, editors, and AI systems.

     [ Read more: The Internet Is No Longer Just for Humans—AI Bots Love Markdown ](https://b13.com/knowledge/the-internet-is-no-longer-just-for-humans-ai-bots-love-markdown)
- ![Several colorful web page mockups stacked together, showcasing different layouts and design elements against a purple background.](https://b13.com/fileadmin/_processed_/e/3/csm_CaminoTheme_Headerbild_d082598009.webp)

    ###  Camino—The Need for a Default Theme in TYPO3 Is Real

     27 January 2026 | Benni Mack

     With TYPO3 v14, Camino introduces a default theme that removes friction from first installs. Why this matters—and how TYPO3 laid the groundwork.

     [ Read more: Camino—The Need for a Default Theme in TYPO3 Is Real ](https://b13.com/core-insights/blog/camino-the-need-for-a-default-theme-in-typo3-is-real)