How to Create Custom Content Elements in TYPO3

A webpage produced by TYPO3 consists of various pieces of content, contained in semantic containers, called “Content Elements” in TYPO3 parlance. Content elements contain a given set of information—a header, text, and an image for example. This set of information is called a “Content Type.” Content elements and content types can be re-used or re-ordered, have their output visibility determined by some business logic, sent for translation, and much more. For us, the fact that we (and you!) can build our own blocks is one of the unique selling points (USPs) that sets TYPO3 apart from other CMSs in power and flexibility.
If you set up a new instance with a basic install package you get a number of default content-elements and -types like “Text,” “Text with Image,” and “Bullets.” While these are essential, useful, and you can style the page output to suit your needs, as soon as you start working with real-world design templates for larger projects, you will almost certainly need additional content element types.
There are a number of third-party extensions that help you create content elements for specific purposes. While using these extensions might give you fast results, the added dependencies on third-party extensions might come back to haunt you down the road. By “haunt” in this case, we mean when the next TYPO3 update requires the third-party developer to update their extension, you have no control over when that will happen. The update might take longer than you need and force you to choose between staying on a previous (potentially insecure) version or breaking your site.
At b13, we create custom content types in a few simple steps, without relying on third-party extensions. We call this way of working and the custom content types we create “core-near.” They do not depend on third-party solutions, and will not break during upgrades. We recently created a content type to display code blocks with syntax highlighting for this website, our own blog. We thought this content type was the perfect example to show you what is possible and how it is done following best-practices.
Backstory
As we’re ramping up our efforts to share how we work with TYPO3 CMS and other technologies, we figured we would be posting code fairly often on our blog. We wanted code snippets to be automatically displayed with syntax highlighting to make them easier for people to parse and understand.
The standard go-to solution is adding a JavaScript library (like highlight.js) to your source code that uses JavaScript magic to identify code blocks and re-render them in some useful color scheme. This option was not available for us; our website is fully AMP-compliant (to the Accelerated Mobile Pages standard) and the AMP best-practice is to keep JS usage to an absolute minimum. Loading an entire JS library to then only use a fraction of it on a given page is clearly not a path to speeding page load times in the browser.
We eliminated the need to load an entire JS library thanks to a PHP package called highlight.php that does exactly what highlight.js does in the browser. This way, we also move the rendering to the (much faster) web server and deliver preformatted output to the user. Using highlight.php we can render the code snippets in the TYPO3 backend, fully cache them, and eliminate the need to add JavaScript to our frontend.
Enter our content type, “code block”. It allows us to enter code snippets as content directly in the TYPO3 backend. The system knows (because we set it up and configured our templates and rendering) that this content gets rendered with code syntax highlighting for output in the frontend—for display on the page where you, dear readers can get the most out of it.
Creating a custom content type for TYPO3
To reuse our content type in different TYPO3 instances, we created the “contentblock” extension. Its sole purpose is to adds the “contentblock” content type to your TYPO3 installation. In this post, we will look at the various different bits and pieces of code and configuration needed to add the content type to TYPO3 using this extension as an example. Our contentblock extension is available here and can be installed using this Composer command: composer req b13/codeblock
What Goes into a Content Type?
A content type for TYPO3’s page module is defined by a number of configurations. We’ll go through the seven steps you need to implement to create and enable the content type we want and the UI elements needed to support it for content editors. We’ll be adding files and configuration to a few different parts of the TYPO3 backend as follows:
- Database field: Add a field to the database table for “tt_content”.
- Backend TCA:
- Add configuration for the addition backend form field for the “tt_content” table in the TCA (Table Configuration Array).
- Add the content type to the list of available content types.
- Add the configuration options for available fields for editors in the backend.
- New Content Element Wizard: Add the content type to the wizard.
- Backend Content Element Preview in Page Module: Add an editor preview in the TYPO3 backend Page Module to show the content to the editors.
- Create a DataProcessor: Process content using a DataProcessor to apply highlight.php syntax highlighting to the output.
- TypoScript Configuration: Every content element type needs a TypoScript configuration to define what to display in the frontend.
- Fluid Template: We add a Fluid Template to render our content element type in the frontend.
Now, let’s look at each step in detail.
Step-by-Step How-To
1. Add a Database Field
If an extension needs to modify the database, a file ext_tables.sql needs to be added to the extension. The syntax is SQL, and even though we are adding a field to an existing table, we use the CREATE TABLE syntax. TYPO3 takes care of adding our field correctly. For more information about changing database tables and fields see the TYPO3 manual here.
We want to display a dropdown list of all the coding languages available that highlight.php supports, so editors can easily specify a given programming language (and a corresponding specific syntax highlighting scheme). For our custom content type, we add a field code_language to the table tt_content.
And this is how our ext_tables.sql file looks:
1
2
3
CREATE TABLE tt_content (
    code_language text DEFAULT '' NOT NULL
);
2. Add the Configuration to the TCA
The Table Configuration Array (TCA) is the configuration layer on top of the database that TYPO3 works on. The TCA holds all configuration options for database fields and tells the system how to display a specific field and its value or value options to backend users in various forms. Read more in the TCA documentation here.
For our purposes, we will add three things to the TCA for the table “tt_content”. All configuration is included in the file Configuration/TCA/Overrides/tt_content.php:
a) Add the configuration for our newly created field code_language
We add the new field as a select element. The values a backend user can select are generated from a separate DataProvider (see Classes/DataProvider folder), exactly how that works is a little out of scope for this example. We also could have just added a list of items manually. We use TYPO3 Core’s ExtensionManagementUtility to add the new field configuration to the TCA for tt_content:
1
2
3
4
5
6
7
8
9
10
11
12
13
14
15
16
17
18
19
20
21
// Add dropdown for code language to TCA.
$additionalColumns = [
    'code_language' => [
        'label' => 'LLL:EXT:codeblock/Resources/Private/Language/locallang_db.xlf:tt_content.code_language',
        'config' => [
            'type' => 'select',
            'default' => '',
            'itemsProcFunc' => 'B13\\Codeblock\\DataProvider\\CodeLanguages->getAll',
            'renderType' => 'selectSingle',
        ],
    ],
];

\TYPO3\CMS\Core\Utility\ExtensionManagementUtility::addTCAcolumns('tt_content', $additionalColumns);

\TYPO3\CMS\Core\Utility\ExtensionManagementUtility::addToAllTCAtypes(
    'tt_content',
    'code_language',
    'codeblock',
    'before:bodytext'
);
b) Add our Content Type to the list of available Content Types (database field CType)
Again, we use the ExtensionManagementUtilty API to modify the TCA configuration for the field “CType” and add our new content type to the list.
1
2
3
4
5
6
7
\TYPO3\CMS\Core\Utility\ExtensionManagementUtility::addTcaSelectItem(
    'tt_content',
    'CType',
    ['LLL:EXT:codeblock/Resources/Private/Language/locallang_db.xlf:tt_content.CType', 'codeblock', 'content-codeblock'],
    'html',
    'after'
);
Note: The use of content-codeblock as an iconIdentifier (third value in the array noted as third parameter in the following code snippet) requires you to register the icon first, which you can see in ext_localconf.php.
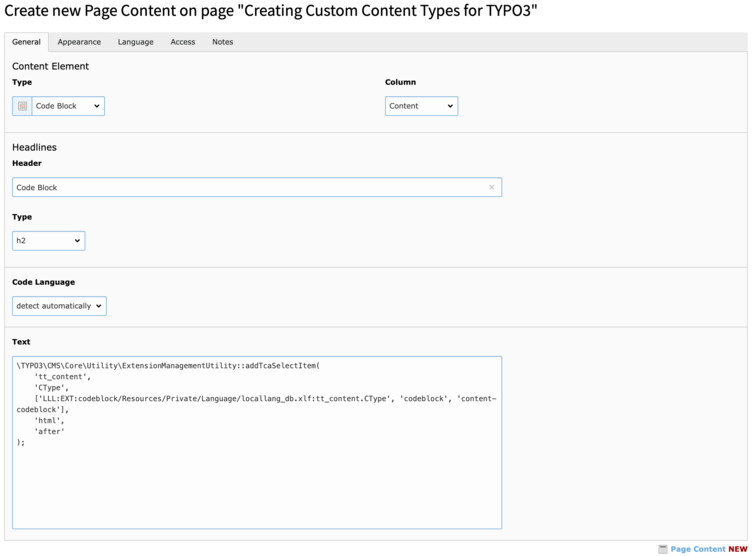
c) Add a form configuration for the edit form of our Content Type
This configuration sets the list of fields, their sort order, and grouping in palettes and tabs for the backend view the editor sees when editing an element of type “codeblock”. Note how to use the configuration property “columnsOverrides” to change the default display behavior of the field “bodytext”, in this case to use a fixed font to help make the backend nice and clean and user-friendly for content editors!
1
2
3
4
5
6
7
8
9
10
11
12
13
14
15
16
17
18
19
20
21
22
23
24
25
26
27
28
$GLOBALS['TCA']['tt_content']['types']['codeblock'] = [
    'showitem' => '
                --div--;LLL:EXT:core/Resources/Private/Language/Form/locallang_tabs.xlf:general,
                    --palette--;;general,
                    --palette--;;headers,
                    bodytext;LLL:EXT:frontend/Resources/Private/Language/locallang_ttc.xlf:bodytext_formlabel,
                --div--;LLL:EXT:frontend/Resources/Private/Language/locallang_ttc.xlf:tabs.appearance,
                    --palette--;;frames,
                    --palette--;;appearanceLinks,
                --div--;LLL:EXT:core/Resources/Private/Language/Form/locallang_tabs.xlf:language,
                    --palette--;;language,
                --div--;LLL:EXT:core/Resources/Private/Language/Form/locallang_tabs.xlf:access,
                    --palette--;;hidden,
                    --palette--;;access,
                --div--;LLL:EXT:core/Resources/Private/Language/Form/locallang_tabs.xlf:categories,
                    categories,
                --div--;LLL:EXT:core/Resources/Private/Language/Form/locallang_tabs.xlf:notes,
                    rowDescription,
                --div--;LLL:EXT:core/Resources/Private/Language/Form/locallang_tabs.xlf:extended,
            ',
    'columnsOverrides' => [
        'bodytext' => [
            'config' => [
                'fixedFont' => true,
            ],
        ],
    ]
];
3. Add an Entry in the New Content Element Wizard
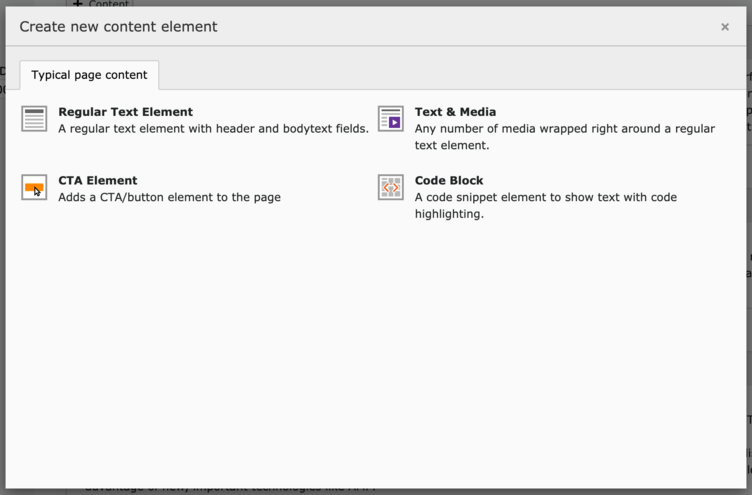
To add a clickable element to the “New Content Element Wizard” we use a few lines of PageTS as you can see in Configuration/PageTs/PageTs.tsconfig:
1
2
3
4
5
6
7
8
9
10
11
mod.wizards.newContentElement {
    wizardItems {
        common.elements.codeblock {
            title = LLL:EXT:codeblock/Resources/Private/Language/locallang_db.xlf:tt_content.CType
            description = LLL:EXT:codeblock/Resources/Private/Language/locallang_db.xlf:tt_content.wizard.description
            tt_content_defValues.CType = codeblock
            iconIdentifier = content-codeblock
        }
        common.show := addToList(codeblock)
    }
}
To make use of an iconIdentifier you have to register the icon first, see comment above.
4. Add an Element Preview to the Page Module
Depending on the value of your “code” field, the element preview in the page module won’t show you anything except your headline:


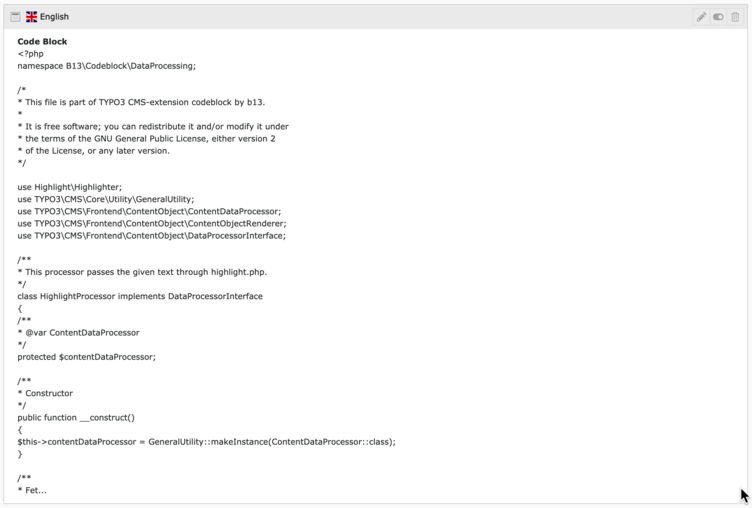
This is due to the default rendering of content elements not showing PHP code at all, removing HTML tags for HTML content, etc. After all, the backend preview is meant to be a schematic preview of the content and structure, not a full rendering of the content.
To change that and make our content appear for the editors, we also add a custom preview configuration for our element. This is done in Classes/Hooks/CodeblockPreviewRenderer.php:
1
2
3
4
5
6
7
8
9
10
11
12
13
14
15
16
17
18
19
20
21
22
23
24
25
26
27
28
class CodeblockPreviewRenderer implements PageLayoutViewDrawItemHookInterface
{
    /**
     * Preprocesses the preview rendering of a content element of type "codeblock"
     *
     * @param \TYPO3\CMS\Backend\View\PageLayoutView $parentObject Calling parent object
     * @param bool $drawItem Whether to draw the item using the default functionality
     * @param string $headerContent Header content
     * @param string $itemContent Item content
     * @param array $row Record row of tt_content
     */
    public function preProcess(
        PageLayoutView &$parentObject,
        &$drawItem,
        &$headerContent,
        &$itemContent,
        array &$row
    ) {
        if ($row['CType'] === 'codeblock') {
            if ($row['bodytext']) {
                $bodytext = GeneralUtility::fixed_lgd_cs($row['bodytext'], 1000);
                $itemContent .= $parentObject->linkEditContent(nl2br(htmlentities($bodytext)), $row) . '<br />';
            }

            $drawItem = false;
        }
    }
}
Register the hook in the extensions ext_localconf.php-file:
1
2
$GLOBALS['TYPO3_CONF_VARS']['SC_OPTIONS']['cms/layout/class.tx_cms_layout.php']['tt_content_drawItem']['codeblock'] =
\B13\Codeblock\Hooks\CodeblockPreviewRenderer::class;
Et voilà! We now have a usable preview in the page module:
Notes on backend element previews
For many elements, you can use Fluid templates as Backend Previews or you won’t even need to add custom fields to databases. You could set a backend view template using PageTS if you only want to show certain fields; in our case we need to parse the content a special way. To set a Fluid template with TSConfig for a content element preview, see the typo3/systext/backend/Classes/View/PageLayoutView.php, function tt_content_drawItem($row) in your TYPO3 codebase!
5. Create a DataProcessor
We want to process the code snippet with highlight.php, add it to our content element, and render the result in our frontend. To do that, we need to process the content using a DataProcessor. You can find the full file in Classes/DataProcessing/HighlightProcessor.php.
We use the value of a specified field ($processorConfiguration['field']), and process it using highlight.php and return a formatted version of the value to be used in the frontend output.
1
2
3
4
5
6
7
8
9
10
11
12
13
14
15
16
17
18
19
20
public function process(ContentObjectRenderer $cObj, array $contentObjectConfiguration, array $processorConfiguration, array $processedData)
{
    $fieldName = $processorConfiguration['field'];
    $targetVariableName = $cObj->stdWrapValue('as', $processorConfiguration, 'bodytext_formatted');
    $highlight = GeneralUtility::makeInstance(Highlighter::class);

    // Let highlight.php decide which code language to use from all registered if "detect automatically" is selected.
    if (!$processedData['data']['code_language']) {
        $languages = $highlight->listLanguages();
        $highlight->setAutodetectLanguages($languages);
        $highlighted = $highlight->highlightAuto($processedData['data'][$fieldName]);
    } else {
        $highlighted = $highlight->highlight($processedData['data']['code_language'], $processedData['data'][$fieldName]);
    }

    $processedData[$targetVariableName]['code'] = $highlighted->value;
    $processedData[$targetVariableName]['language'] = $highlighted->language;
    $processedData[$targetVariableName]['lines'] = preg_split('/\r\n|\r|\n/', $highlighted->value);
    return $processedData;
}
6. Add TypoScript Configuration for Frontend Output
To have TYPO3 output anything in the frontend, we need to tell it what to do when it attempts to render a content element of type “codeblock”. We extend the TypoScript configuration for tt_content with our custom content type configuration in Configuration/TypoScript/setup.typoscript, adding the configuration for dataProcessing to our element configuration to process the value of the “bodytext” field:
1
2
3
4
5
6
7
8
9
10
11
12
tt_content.codeblock =< lib.contentElement
tt_content.codeblock {
    templateName = Codeblock

    templateRootPaths.0 = EXT:codeblock/Resources/Private/Templates

    dataProcessing.1567071612 = B13\Codeblock\DataProcessing\HighlightProcessor
    dataProcessing.1567071612 {
        field = bodytext
        as = bodytext_formatted
    }
}
7. Add a Fluid Template for Our Content Type
As the last step, we need to create the Fluid template to render the content in our frontend. The Fluid template name and folder are defined in the TypoScript setup above and can be found at Resources/Private/Templates/Codeblock.html.
1
2
3
4
5
6
7
8
9
10
11
<f:layout name="Default" />

<f:section name="Main">

	<pre>
		<code class="hljs {bodytext_formatted.language}">
			{bodytext_formatted.code -> f:format.raw()}
		</code>
	</pre>

</f:section>
Result: A Repeatable Template for Content Types
Every TYPO3 project at b13 includes individual designs, custom templates, and custom content types to meet a client’s specific needs. Not all use cases require as many changes as we’ve included in this rather detailed example. Nonetheless, using these simple steps, we created a new content type in a matter of minutes.
The basic building blocks as described above are the same each and every time. Once you’ve got the concept down, it is easy to add new, custom content types so that your editors can create content that looks good in any template.
Taking things one step further, we showed you how to make your work more valuable by creating an extension you can reuse to add a given content type to any or all of your projects.
As added benefits, custom content types created this way (we call it “core-near”) won’t break because of an update and they also keep you and your TYPO3 instance free from relying on third-party developers.
We conduct workshops on how to build site extensions and how to migrate from third-party solutions to custom content types that work just like TYPO3 core’s native content types.
Contact us if you want to learn more or need help integrating your templates.
